1-888-392-8766   0 Cart
Added to Cart
    You have items in your cart
    You have 1 item in your cart
    Total
    Check Out Continue Shopping

    Articles — Product Information

    Is silicone bad? What is silicone?

    The Role Silicone Plays in Car Care Products

              By Mike Phillips (Autogeek.net)

    One of the most frequent comments I hear when I go to car club meetings and events is that silicone is bad for your car. It's a common myth, from years gone by, that the mere presence of silicone near a car will cause the paint to shrivel up and fall off or prevent it from ever being repainted. These myths are false, but the latter is based on factual problems painters once experienced. The fact is that all modern automotive paints contain silicone as an ingredient to help the paint to spray and flow smoothly.

    Most of the concerns people have about silicones and products that contain silicones stem from the days when lacquers were used as the primary car finish. Back then, if the surface wasn't properly prepared, residual silicones on the bodywork or in the shop environment would cause paint defects. The most common silicone induced problem is a small defect referred to as "Fish Eyes".

    Fish eyes are small craters that form in the paint finish. Fish eye defects form where the paint piles up in a circle surrounding a point on the surface that contains a contaminant. The reason freshly sprayed paint does this is because contaminants like wax and silicone tend to create high surface tension and do not allow the paint to properly flow and self-level.

    Instead of laying down flat, paint moves away from these ingredients, forming a ring around them that has the visual appearance of what is historically described as a fish eye. In severe cases, where the painter does not properly prepare the bodywork for painting, contamination from wax, oils and silicones can cause paint adhesion problems.

    Knowledge of paint and other automotive finishes have evolved and grown substantially since the 1950's. The problems painters encountered 50 years ago are more easily addressed with today's modern paint formulas and prepping chemicals. Likewise, the modern paint facility has evolved into a high-tech environment (primarily due to environmental regulations), and paint additives help overcome common flaws.

    More importantly, modern paint technicians are educated in their craft. Until the 1970's, there were very few formal training programs available for young men and women entering the automotive repair industry. Today there are certified schools that specialize in formal education for the automotive industry. This includes paint manufacturers, who provide in-depth training for anyone who uses their paint systems.

    All professional body shops understand that the cars they repair have been maintained using products that contain waxes, oils and silicone. For this reason, all professional repair facilities perform the necessary preparation work required to insure that the paintwork is free of contaminates before they begin their work. In so doing, the dreaded "fish eyes" will not be a problem.

    The preparation work includes using special degreasers and silicone removers that effectively remove these substances from the surface or chemically alter their molecular structure in such a way to insure they pose no problems. If there is ever any question or doubt about the surface to which new paint is going to be applied, painters will use a paint additive to eliminate fish eyes. Interestingly enough, the paint additive that eliminates fish eyes is typically a special silicone additive.

    SILICONES USED IN CAR CARE PRODUCTS
    There are many kinds of silicones available for use in car care products. They vary in form and functionality. Car care chemists select the best performing silicones to create a desired finish for each kind of car surface.

    Silicones are primarily used to modify or enhance a specific characteristic of another ingredient in a polish, wax or protectant formula. Silicones are not used for any characteristic they offer in and of themselves. There are some functions in a car care formula that only silicone can produce or no other ingredient can perform better.

    One of the most commonly used features of silicone is its ability to lubricate (improve slip). The use of some types of silicone in a formula acts to make the product easier to apply and buff off. In this way, silicone lubrication helps reduce surface marring (scratches and swirl marks) induced from wiping with bad toweling or applicators. That's a benefit to you.

    Chemists also use silicones to create water-in-oil emulsions, reduce emulsion particle size, to stabilize emulsions, and to improve spreading and coverage of wax products. Most modern silicone formulas are water soluble (no oil or petroleum), and are completely inert. The best way to describe most forms of silicone is to think of it as a man-made wax ester. Silicone is created by the reaction generated when you combine fatty acids with polydimethylsiloxane (or other derivatives of the compound).

    The fear and confusion surrounding this single ingredient, silicone, is an ongoing problem. Some small car care chemical manufactures create fear, uncertainty and doubt in people's minds by claiming their products contain no harmful silicones, suggesting that silicone is harmful to the paint. This product hype and misinformation spread from person to person, generation to generation, and now-a-days on the Internet, exaggerates the myth that silicones in car care products are harmful. The fact is that the largest and most respected names in the paint and body shop industry, which include 3M and Meguiar's, use silicones in their car care products to make them better.

    The facts are indisputable. Silicone is part of the protective system in paint and helps the paint look better and last longer. Silicone cannot harm paint, let alone anything else it is formulated into, or sitting on top of, especially in the form of a coating of wax. Without properly blended silicones, waxes would be difficult to apply and would not have the high gloss and radiance we enjoy.
    Original Article

    Car Care Terminology for the Beginner.

    eShine Car Care Beginners Terminology
    Just starting out in the detailing community? Do you feel that Canadian Tire and Walmart don't have the selection or expertise that you want/need to protect and maintain your paint? I'll bet you've watched a few YouTube videos and are now more confused than ever. Perfect. You found a great website to help you make sense of all that terminology and give recommendations for the products you'll need for every part of your vehicle.

    I will list common types of chemicals and their uses below. Hopefully this will help you to navigate through the process of perfecting and maintaining your paint. We will start at the beginning of the exterior, and then move on from there.

    Fallout Removers

    A fallout cleaner chemically removes metal particles from the paint. You will most often notice the tiny brown spots on a white or light colored car. These spots are often referred to as brake dust, or rail dust. Fallout cleaners, such as Iron Maiden break down and liquefy the metal contaminants. These cleaners are relatively quick to use, and take most metal contaminants out of the paint. Why would you use a clay bar instead? A Claybar will remove all metal contaminants, and will also remove organic contaminants such as over-spray and bug particles.

    Other Fallout Removers:

    CarPro IronX Gyeon Q2M Iron Remover
    Carpro Canada, Carpro fallout remover, carpro products with free shipping Gyeon Canada, Gyeon products in Canada, best products Canada


    Claybar Options:

    Riccardo Mild Clay Griot's Paint Clay Chemical Guys Claybar
    Riccardo Elastic Clay Bar, Best Clay Bar, mild clay bar, how Do I remove overspray? Griot's Garage Canada, Griot's Garage Products, Paint Cleaning Clay, What is paint clay? Chemical Guys Medium Clay Bar, Chemical Guys Canada


    Clay Bars and Clay Bar Substitutes

    Clay bars remove contaminants from your paint, but how do you know if your paint is contaminated? If the surface feels rough there are usually contaminants in your paint. Often even brand new cars are full of fallout from transportation. Clay barring a car can take a lot of time. You have to lubricate each section using a clay lube, followed by gliding the clay bar over the affected area. Claybars have a consistency similar to play-dough and you will feel a slight pull as it removes the contaminants from the paint. Often one pass is enough, but several may be needed to remove heavily over sprayed or contaminated cars.

    Recently clay mitts and pads have hit the market. These do the same as a traditional clay bar, yet allow for ease of use.

    For more information check out our blog: Clay Bar Use

    All Purpose Cleaners

    All-purpose cleaners are often referred to as APC, or degreasers. An APC is a strong degreaser that removes oils and dirt from surfaces. Most often you would use an APC before polishing and waxing a car. It is also often used on wheels and engine bays. Most all-purpose cleaners are concentrate and can be diluted. With a higher dilution they can be often be used on the interior as well.

    Nonsense Cleaner Riccardo Kleenzit CarPro MultiX
    Nonsense Invinsible Super Cleaner Chemical Guys. scent free cleaner, Riccardo Kleenzit, Best APC, Clean mud off my ATV, best APC in Canada? Carpro Canada, Carpro MultiX, carpro products with free shipping, CarPro Canada

     
    No Rinse (NR)

    No Rinse (NR) washes were designed for areas with limited water use, such as RV parks, Marina's, Apartment buildings. They have gained popularity in the recent years as there have been several areas with water bans and restrictions.  The no-rinse wash is a concentrated soap you would apply with a sponge or foam cannon. The wash, as per the name, does not need to be rinsed. It will dry to leave a streak free surface or can be wiped clean with a quality microfiber towel. 

    A no rinse product works well on not so dirty cars. If there is heavy mud or debris a traditional car wash is more effective.

    Some No-Rinse Options:

    Griot's Rinseless Wash & Wax

    Optimum No Rinse Wash & Shine

    Chemical Guys Rinse Free Wash & Shine
    Griot's Garage Canada, Griot's Garage Products, Rinseless Wash And Wax, Howe can a wash be rinseless? Optimum No Rinse Canada, Optimum ONR Canada, No rinse Wash Chemical guys Rinse Free Wash and Shine, Chemical guys Canada

    Car Wash

    A true car or auto wash is safe to use over waxes and sealants. They will not strip the wax or sealant off the car, and will foam to remove dirt and grease.

    For more information, check out our Blog: Car Washing

    Wash and Wax

    Wash and wax is a car wash with added gloss enhancers. Wash and wax shampoos are safe to use on waxed cars, they leave behind some additional short term gloss. This product often has carnauba wax as an ingredient. Store these products at room temperature as freezing may cause separate.

    Compound

    Compounds are designed to be applied by machine.  Compounds are used to remove small scratches and swirls from the finish. Most compounds require the speed and heat produced by a polisher.

    Polish

    A polish prepares the surface for a wax or sealant.  It removes minor swirls, cleans up the paint and makes it shiny. A pure polish does not have any protection in the polish, just cleaners and often fillers. A lot of polishes can be used by hand or machine.

    All In One (AIO)

    An All in One product refers to polishing abilities, plus protection. These products clean the surface, fill small imperfections, and give some protection to the surface.

    Sealant

    A sealant is synthetic protection that protects your paint. A true sealant does not have any correction properties and is usually very thin. Most sealants last anywhere from 6 to 18 months. This protection all depends on the product and the environment the vehicle is exposed too.

    For more information, check out our Blog: Applying a Sealant

    Permanent Coating

    A Permanent coating is a coating that changes the paint. Often there are ceramic particles in the paint that harden the paint slightly and help it reduce the frequency of swirls and small marks left from drying and everyday care.

    Paste Wax

    A wax is mostly a solid that is made from carnauba. The carnauba is blended with other ingredients to make it soft enough to be applied to your vehicle. A wax will give an amazing shine, and will last on average about 3 months. A wax can be applied over a sealant or coating to add to the finish, but is not always necessary.
     

    Quick Detailer (QD)

    A quick detailer is a spray wax that is designed to slightly clean the car and add some gloss in between washes. It is in a spray bottle and often can be used on plastics and metals as well.

    Still have questions? Contact us.

    Buffing Pad Prep and Care

    This article explains a few simple methods of pad care starting with pad prep, then proper pad pressure and use, then finishing off with proper pad cleaning. With proper pad care your pads should last many details. However…If you do not follow proper pad use and maintenance your pads can fail on the very first use!

    Pad Prep  

    It is very important to dampen the pad throughout, this does not mean dripping wet or barely misted with water. When the pad is dampened properly it will become very flexible and much easier to use. If the pad is dampened too much it will sling product everywhere and make a very undesirable mess on the vehicle and yourself! On the flip side if the pad is under dampened it will be difficult to use due to the stiffness of the pad and also be difficult for the product to absorb into the pad properly. Also if the pad is under dampened or not dampened at all, the foam will be brittle and tear/shred while you are using the pad. The following is the method I personally use to prep my pads.

    Items Requires: Plastic Bucket, Clean Towel, Water.

    STEP 1

    I first SOAK the pad throughout. This can be done in two ways, under running water or in a bucket half filled with water. Under running water massage and squeeze the pad until it absorbs water throughout the pad. If using a bucket of water you can hold the pad under the water and squeeze the pad a few times.

    STEP 2

    Once the pad is soaked throughout I fold the pad into a “U” shape and using my palms I squeeze the majority of the water out. Squeeze it several times until the majority of water is removed. The pads we sell are so durable you can also wring them out without damage!


    STEP 3

    Once this is done I place the pad in a towel and either squeeze or wring the towel that contains the pad. This method works great to remove residue water that is left from the first step, the remaining water will soak into the towel. You can also wring the pad inside the towel as shown here using our Dehydrator drying towel.


    STEP 4

    The last step is optional, you can use this method in a pinch instead of the towel method. If you used the pail to wet the pad you can now either empty the pail or just be sure to hold the polisher and pad below the rim of the bucket but obviously NOT into the water!

    With the pad attached to the machine on a low speed hold the pad in the center of the pail and turn machine on for a few seconds. The pail allows the pad to spin dry while not spraying the water all over the shop and your legs. Once this is complete you are now ready to buff! You may read this article and think this is a lot of work but once you have tried the above methods you will see you can prep a pad in 1-2 minutes!

    NOTE: During buffing the pad will start to dry on the backside. The face will stay wet due to the polish but the backside can become brittle and the pad can start to crack under the velcro. It may be necessary to completely re-dampen the pad during the job.

    Pad Pressure  

    Even with proper pad prep if proper pad pressure is not applied your pad can be ruined. With not enough pad pressure your pad can fly off the machine, product will splatter all over, and the pad Velcro and backing plate can burn due to slippage between the two. Inadequate pressure will usually burn the backing plate and/or the Velcro on the pad itself.

    Here is what inadequate pressure looks like, the backing plate is completely parallel to the pad and is not compressing the pad at all.

    Here is the perfect amount of pressure, the backing plate is indenting the back of the pad about a 1/4" but is NOT crinkling the edge of the pad.

    When too much pressure is applied it causes the backing plate to cut into the back of the pad and by deforming the Velcro it also causes the Velcro to detach from the foam. When you see the edge of the velcro deform and crinkle you are applying too much pressure.

    Remember each different pad will allow different pressures. For example a blue pad requires little pressure before it deforms the pad but if I was using an Orange pad I would be able to apply more pressure before the pad deforms.

    Here are a few pictures of damaged pads sent from customers, you can see the Velcro detaching and also the imprint from the backing plate due to excessive pressure. You can also see how the edges of the Velcro are crinkled.

    Above are some shots that show the proper pressure that needs to be applied to the pad. You can see the back of the Velcro starts to deform and crinkle the edges when too much pressure is applied.

    Pad Cleaning

    If you do not clean your pads after use the compound/polish/wax will dry up into the pad causing the foam to become brittle, the pad will also be much tougher to clean at this point. I have tried washing pads in the washing machine with limited success, the exterior of the pad gets cleaned but not the center of the foam, there was much residue left. To clean foam pads you do not want to use a detergent that is high-suds, imagine a dish sponge soaked with soap, no matter how much you rinse it, soap will still bubble! The last thing you need when polishing a vehicle is bubbles! We sell designated pad cleaning powder such as Snappy Cleaning Powder. If in a pinch you can also use an all purpose cleaner such as Kleenzit.

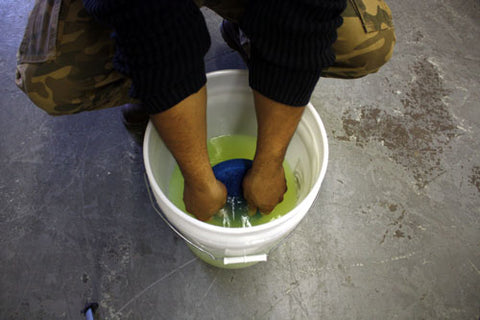
    Fill a 5 gallon pail with warm/hot water and add your pad cleaning solution. Now simply hold the pad under the solution and knead/massage the pad while submerged. You will actually feel when the pad is clean, it will first feel slimy then after 15 seconds or so it will start to feel squeaky clean!

    If you are cleaning a large number of pads in one shot you may want to dump the dirty water and make a new batch of solution halfway through your batch of pads. Once all pads are clean fill the bucket with clean water and rinse the pads in that. Another option is to do this under running water until you see no trace of solution (the water will run clear at that point)

    From there just squeeze the majority of the water from the pad and store. You can use the methods from the pad prep above to remove the water from the pad .I store my pads in a plastic container with a loose lid with a couple of holes in it. If damp pads are stored in a sealed container they will stink and can get moldy! 

    Klasse Application Instructions

    eShine Canada is proud to offer Klasse Car Care products! We hope this guide to proper application will be of assistance! Klasse All-In-One and High Gloss Sealant Glaze are among the best Paint Protection products available today. With proper preparation and application Klasse will keep your vehicle looking it’s best while offering unsurpassed durability and protection.

    The Klasse “Twins”

    • Klasse All-In-One is a true one step product. It cleans polishes and protects in one easy step! The cleaner in All-In-One removes existing wax, road films, light oxidation and visually reduces minor swirls. Klasse is Base and Clear coat safe.
    • Klasse Sealant Glaze provides additional sealant protection and a deeper, high gloss finish. Being a pure sealant, Klasse sealant Glaze can be layered multiple times to produce an even deeper, wetter finish! Layering will also increase the durability up to one year! Klasse is Base and Clear coat safe.

    Preparation

    • Properly wash and dry vehicle. (See our proper washing techniques article)
    • Work in a shaded area out of direct sunlight.
    • Surface must be adequately prepared for application of any polish. Excessive swirls, scratches or paint contamination must be properly addressed prior to Klasse application.

    Klasse All-In-One Application by Hand

    • Klasse All-In-One should be applied with an applicator such as our 4" Blue Polish Applicator. It can also be applied via terry cloth or microfiber towel.
    • Wet the Applicator, then wring out any excess water. The applicator should be evenly damp, but not wet. To dry the applicator you can place the applicator in a towel and squeeze; this leaves the applicator damp, but not wet.
    • Place a quarter sized dab of Klasse All-In-One on the applicator and apply using large overlapping strokes. It is a good idea to follow the contour of each vehicle. Move in a moderate speed applying moderate pressure. Do one section at a time (e.g., half hood, one fender etc) with each quarter sized dab of Klasse All-In-One.
    • If applicator starts to get dirty or dry, rinse applicator with water and wring out again.
    • After the product has been worked into the paint it will haze. When Klasse hazes remove with a plush microfiber towel. If the product is caked on and difficult to remove, you applied too much product. Try thinner application on the next panel.
    • If your vehicle is older, more neglected and possible badly oxidized, you may want to try a second application of Klasse All-In-One before moving onto the Sealant Glaze.  

    Klasse All-In-One Application by Machine

    • Using a Polishing pad such as our Lake Country 6.5” CCS Green Polishing Pad, apply 3 dabs or lines about 2 inches in length along the perimeter of the pad.
    • Please refer to Proper Pad Care for instructions on how to prep your pad.
    • If using the popular Porter Cable Dual Action Polisher, set to a speed of 4.
    • Apply pad to surface before turning on unit.
    • Work one section at a time (e.g., Hood, Door). Apply more All-In-One as needed to keep the polishing pad moist.
    • After Klasse All-in-One hazes remove with a plush microfiber towel. If the product is caked on and difficult to remove, you applied too much product. Try thinner application on the next panel.

    Klasse Sealant Glaze Application by Hand

    • While the Klasse All-In-One is applied easily, Sealant Glaze can be temperamental, and the Application/removal procedure should be followed closely.
    • Work in a shaded area out of direct sunlight and on a cool surface. This allows for longer curing time and allows the Klasse Sealant Glaze to be worked longer before hazing.
    • Klasse Sealant Glaze should be applied with a Fine Foam Applicator such as our 4" Black Sealant Applicator. Using the proper applicator with Klasse Sealant Glaze is crucial to ensure a thin/even application. If Klasse Sealant Glaze is applied too thickly or unevenly, it will be very difficult to remove.
    • Wet the Applicator, then wring out any excess water. The applicator should be evenly damp, but not wet. To dry the applicator you can place the applicator in a towel and squeeze; this leaves the applicator damp, but not wet.
    • Place a quarter sized dab on the applicator and apply with large overlapping strokes. It is a good idea to follow the contour of each vehicle. Move in a moderate speed, little to no pressure is required. Do one section at a time (e.g., half hood, one fender etc) with each quarter sized dab of Klasse Sealant Glaze. Klasse Sealant Glaze should be applied so thin that the product is difficult to see when applied!
    • If applicator starts to get dirty or dry, rinse applicator with water and wring out again.
    • Klasse Sealant Glaze can be applied/removed in two ways for maximum ease,
      1. Wipe-On, Wipe-Off. This method involves simply applying the Sealant on smaller sections at a time and removing immediately. It is a good idea to let sit for approximately 15 seconds. Many find this way reduces the chance of difficult removal and find the end result is unaffected. OR,
      2. Apply the Sealant Glaze to the entire vehicle before you start to remove the residue. The longer you let Sealant Glaze Dry, the easier it is to remove. Many customers even let it sit overnight!
        • Remove with a plush microfiber towel. If the product is caked on and difficult to remove, you applied too much product. Try thinner application on the next panel.  

        Klasse Sealant Glaze Application by Machine

        • While All-On-One applies easily by machine, Sealant Glaze can be a little more temperamental. For this reason, and because it applies so easily by hand, we recommend applying by hand even if All-In-One was applied by machine. After several hand applications you will have a better idea of the sealants characteristics and may want to save time by machine applying. When you are ready for that step please follow these directions.
        • Work in a Shaded area out of direct sunlight and on a cool surface. This allows for longer curing time and allows the Sealant Glaze to be applied longer before hazing.
        • Using a Finishing pad such as our Lake Country 6.5” Blue Finishing Pad, apply 3 dabs or lines about 2 inches in length along the perimeter of the pad.
        • If using the popular Porter Cable Dual Action Polisher, set to a speed of 4.
        • Apply pad to surface before turning on unit.
        • Work one section at a time (e.g., Hood, Door). Apply more Klasse Sealant Glaze as needed to keep the polishing pad moist.
        • It will appear that you are not applying any product, but in fact you are. Keep moving the polisher over the area you’re working on until the polisher glides easily and there is no visual haze or film.
        • Do not buff off any residues yet. Continue adding small amounts of Sealant to the pad and complete the entire car.
        • Applying Sealant Glaze by machine leaves little to no residue! After applying to the entire vehicle, remove with a plush microfiber towel.

        Tips and Tricks!

        • After your initial application of both Klasse All-In-One, and Sealant Glaze, try layering the Sealant Glaze! This will increase depth and durability. Wait a minimum of 24 hours in order for each layer to cure before applying another. There is no need to use the All-In-One again from this point unless surface becomes contaminated. Using the All-In-One again will remove your layers of Sealant Glaze starting you from scratch. High Gloss Sealant Glaze can be layered without fear of yellowing or discolouration. Some show car owners have a dozen or more layers of Sealant Glaze on their cars!
        • A common practice amongst show car enthusiasts is to top Klasse Sealant Glaze with their favourite Carnauba. This is not done for durability but more for that extra depth and glow only Carnaubas can offer. The brightness of the Klasse under the Carnauba will produce a breathtaking finish judges will drool over! Keep in mind; after a carnauba is applied you CAN NOT apply Klasse Sealant Glaze again until the carnauba is removed. An application of Klasse All-in-One will remove the Carnauba.

        Copyright 2011, eShine Canada (43986)

        Swirl Removal

        Swirls

        Swirl removal is a very important step in proper surface preparation. A swirled (commonly referred to as spider webbed) surface will make even the best waxes appear unacceptable, and often leave the user wondering if he chose the wrong type of polish/wax. Swirls are countless clusters of micro scratches usually caused by improper washing and/or drying. They are much easier seen on darker colour cars, and when the vehicle is in direct sunlight.

        Removing Swirls

        There are two types of products that will remove swirls, 

        1. Abrasive Compounds : Compounds use an abrasive type swirl remover. These swirl removers are usually liquid or paste , and are designed to permanently remove paint defects such as small scratches, spider-webs, and swirls. They do this by removing a very thin layer of paint that contains the damage and exposing a new layer of defect-free paint. Once this is accomplished, the painted surface will be uniformly flat and reflect light in one direction only. Often several steps are required. It is best to use a compound type swirl remover by machine although mild abrasive swirl removers can be applied by hand. Using abrasive compounds will permanently remove the swirls from the paint.
        2. Filler/Resin Type Swirl Removers: The second way swirls are removed are by using a product with no abrasives. These swirl removers use fillers instead of abrasives. They fill in scratches with special resins. This method of swirl remover only works on slight damage and does not permanently repair the damage. It fills in, and hides the imperfections. Some combination polishes (All in One Products) also do the job of a filler type swirl remover, thus reducing the steps required before your final product is applied. Filler/Resin Swirl Removals can be applied by hand or machine.
        3. All In One Type Swirl Removers: These products have a combination of abrasives and fillers. It will do some cutting, though not as much as the pure abrasive. If there is some swirls left, they will be filled in with the resin in the polish. Not every all-in-one product includes cutting abrasives. Read the product description carefully before applying. Often this type is recommended for beginners. It will permanently remove some of the damage, and hide what is left. This method can also be used by hand or machine. For more control over the hand application we recommend the handjobber system.

        Q: How do I know if I have an abrasive compound or filler/resin type swirl remover?

        A: Determining whether or not your product is abrasive or not is easy. Most products will state right on the label or description of the product if it has abrasives or not. When ever a product claims to remove swirls, AND states it is non-abrasive, you can bet it accomplishes this with fillers. Here is the twist, some products actually contain both abrasives AND fillers, these products will always state they contain abrasives but not always mention the fillers. One sure test to check whether or not your products contain fillers is using a 50/50 mix of Isopropyl Alcohol and water. After the application wipe the area with this solution, if the swirls re-appear, then the product does have fillers. All our product descriptions mention which products use fillers or abrasives.

        Q: Which type of swirl remover should I use?

        A: Deciding whether or not to use an abrasive type or filler type should be based on several factors. Filler type swirl removers usually only work on minor swirls, these filler types are easy too use and require minimal experience; they work very well by hand and do not require a machine polisher. Abrasive type swirl removers will remove heavy and mild swirls permanently, but they require a machine polisher. Each type has its own pros & cons.

        Abrasive Compound Type swirl removal

        PROS:

        1. Permanently removes damages from top layer of paint exposing new, unharmed layer.

        CONS:

        1. It is best to use abrasive type swirl removers using a machine polisher. Machine polishers properly break down the compounds and provide an evenly worked area.
        2. Requires some knowledge and/or practice to produce a haze free finish.
        3. Over a long period of time, repetitive use will cause the paint layers to get thin, eventually needing a re-paint. This is extreme and would only happen after many aggressive attempts.
        4. More time consuming, must follow swirl removal with a polish for maximum gloss and protection.

        Filler/Resin type swirl removal

        PROS:

        1. Does not require a machine polisher to apply.
        2. It is a quicker process, and requires minimal experience, simply rub in, then buff off.
        3. Will not reduce paint thickness over time like abrasive polishing will.
        4. Many Polishes have swirl removal capabilities, these products allow you to fill in swirls and polish at the same time reducing the steps toward your final finish.

        CONS:

        1. Swirls are only temporarily hidden rather than removed. When the product wears off the swirls re-appear. The life of the product varies depending on which product you use. Some products can last 3-6 months.

        Removing Swirls By Hand

        Swirls can be hidden by using a mild polish or swirl removal designed for hand use. The edges of the swirl will be rounded off drastically reducing their appearance. When the residue is buffed off the fillers will remain in the lower parts of the swirl hiding them from view. Polishes also add gloss enhancers to the surface making it ready for a wax/sealant. In this example we are using our HandJobber Applicator. It is the next best thing to Machine Application! The HandJobber is a Flexible Urethane Ergonomic Handle that accepts 4" Hook and Loop Pads. The ergonomic design greatly reduces hand fatigue and keeps your hands clean. The design also allows even pressure of the polishing/waxing surface, thus eliminating uneven results due to inconsistent pressures from each individual finger. We recommend Filler/Resin type swirl removers , or very mild abrasives by hand. Many mild swirl removers are often also referred to as polishes. Some examples are Klasse All-In-One, Wolfgang Paintwork Polish Enhancer , Optimum Poli-Seal and Menzerna Power Lock.

        STEP 1

        It’s best to work in a cool shaded area; this allows the product more time to work in before drying up. When working in direct sun, or on a hot surface the product will harden quicker and make it hard, or impossible to work with.

        STEP 2

        Work with one area at a time. A 24”x 24” (Half a door)  is a good size.

        STEP 3

        Apply the product to the applicator. Here we are using Wolfgang Paintwork Polish Enhancer. Wolfgang has great swirl hiding capabilities.

        STEP 4

        Using moderate pressure, work the product in back-forth motions. Switch directions every few strokes mimicking an X pattern.

        STEP 5

        Wipe off residue using a quality microfiber towel.(Tornado or Cookie Monster Towel)

        Depending on what type of product you used, you will now be ready for either polish, or a wax/sealant. If the swirl remover you used was a dedicated swirl remover which only removes swirls, you will want to continue to the polishing product. Polishing products have the gloss enhancers necessary for that show car shine. If you used an-all-in-one polish with swirl hiding capabilities then you can go right to the wax/sealant stage!

        Removing Swirls with Machine Polisher

        Removing swirls with a machine polisher is a much more effective permanent solution. Of course this will not prevent new swirls from happening but with proper care after this procedure, new swirling can be kept to a minimum. By using an abrasive compound and a Machine polisher, we will remove the layer of paint containing the swirls producing a new defect free layer. Machine removal of swirls often requires several steps depending on the extent of damage. In this example I am using a Porter Cable Random Orbital Polisher. This is a very popular polisher amongst enthusiastic detailers. Its random orbital motion makes it nearly impossible to burn paint and can be used by novice detailers.
        STEP 1
        1. It’s best to work in a cool shaded area; this allows the product more time to work in before drying up. When working in direct sun, or on a hot surface the product will harden and make it hard, or impossible to work with.
        2. Work with one area at a time. A 24”x 24” (Half a door) is a good size .

        STEP 2

        Here I am using a Lake Country 6.5" Orange Foam Cutting Pad; I will mist the pad with water to prime the pad. Always prep your pads.(See Pad Prep Article) Proper pad preparation is often over looked. Using the correct methods will lengthen the life of your pad, as well as give you better results. Never start with a bone dry pad.

        STEP 3

        Apply a bead in an X pattern across the pad. I will start with Poorboy’s SSR 2.5

        STEP 4

        Dab the pad in several locations on your surface to distribute the product evenly.

        STEP 5

        Start by setting the dial on a low speed at first and work the product in all areas for 10-15 seconds. This will eliminate sling and prime the surface and pad of product. I usually do this at setting 3. You can use figure 8 patterns, S Patterns or any other consistent overlapping pattern.

        Be sure to consistently cover the entire working area evenly. DO NOT apply excessive pressure! Doing so will not benefit you at all and will only cause premature wear on your pads. Press down slightly and make sure you are not deforming the pad.

        STEP 6

        After 10-15 seconds, kick up the speed to 5 or 5.5 using the same patterns as above. Work the product in until it becomes nearly transparent and just starts to dry. Buffing too long will often cause gumming up on the pad and likely scuff the surface. This scuffed surface will have to be worked again using the same procedure.

        STEP 7

         Use a microfiber buffing towel (The Cookie Monster) to wipe away any residue. Inspect the area, are the swirls gone? If not, repeat the process until they are. Remember, it’s not a race, this process can take time. An average sized vehicle can take 2-4 hours for the swirl removal process.

        STEP 8

        After the area is free of swirls you may notice a slight hazing or fog like finish (More noticeable on dark colors). This is completely normal. This is caused by the abrasives and cutting pad in the previous step. To eliminate this we will step down on the pad and/or the product. How much you step down depends on the combination that you are using. Here I use a 6.5" White Polishing Pad. with a milder product: Poorboy’s SSR2 . Repeat the same procedure as previous steps. The surface will now be crystal clear begging for some protection.

        You are now ready for Sealant and Wax! Your swirl free surface will expose the full potential of your polish and wax producing a show car finish that will leave people breathless.

        Social Proof